Customizing lab ranges is a unique feature that allows you to tailor your Heads Up profile to meet your specific needs (skip to the end of this post for a link to the video tutorial). If you’ve been tracking lab values in your Heads Up profile, you’ve noticed that we provide standard reference ranges for each lab test. These are the same ranges used by most conventional doctors and labs in the US.
Once you connect a medical facility or manually enter your own test results (see this video for instructions), we will also match your personal results against the standard ranges using a green (low risk), yellow (moderate risk) and red (high risk) color coding system. Here’s an example of what this looks like for a typical cholesterol panel:
This works fine for most general use cases but there are some good reasons why customizing lab ranges may be necessary.
[maxbutton id=”1″]
1. Functional vs. Pathological ranges
Conventional medicine typically relies on what are known as a ‘pathological ranges’ for interpreting lab test results. The pathological range is used to diagnose disease. If your personal results fall outside of the pathological range, it usually indicates the potential for disease is present.
Functional ranges take a slightly different approach. They are designed to catch risk before it progresses into a pathological range. For example, the pathological range for fasting glucose may be 65-110 mg/dL whereas the functional range might be 85-100 mg/dL. If your own personal result came back at 105 mg/dL, you would be considered ‘normal’ according to pathological ranges, but a functional range would flag that result for potential early intervention/treatment.
Many health practitioners prefer to work with functional ranges. Customizing lab ranges gives you the ability to decide which approach (functional or pathological) best matches your health goals and customize your Heads Up profile accordingly.
2. Limitations of the standard bell curve
The pathological lab values provided with typical lab tests are actually based on a “bell curve analysis” of all the people that have been to the lab over “x” amount of time (usually in the past year).
The problem with using a bell curve to set reference ranges is that the sicker the population gets, the wider (and less useful) the lab reference ranges become. It may be necessary to look at functional ranges so you are not considered “normal” or “healthy” simply because your lab tests fall in the same range as the majority of the sick people that have been to that lab.
3. Customizing to your personal needs
You may also need to customize lab ranges based on your own personal needs. Factors such as genetics, ethnicity, medications and diet (paleo, keto, vegan etc.) may dictate that lab ranges need to be tailored to your own body and lifestyle choices.
For example, individuals on low-carb/high-fat diets (paleo, keto etc.) tend to have much higher ‘Total cholesterol’ and ‘LDL cholesterol.’ In many cases, these numbers may fall outside the pathological range and would be flagged as a risk factor. However, these same individuals also tend to have much higher ‘HDL cholesterol’ and much lower ‘triglycerides’ and taken as a whole, their cardiovascular risk is very low. By working with a trained health practitioner, you can define ranges that match your specific circumstances
Customizing lab ranges
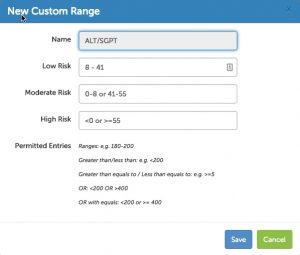
You can edit the default values in Heads Up to enter your own custom ranges (see video tutorial below). Once saved, the color coding will automatically update based on your newly defined values. Here are some of the permitted values for custom lab ranges:
- Ranges: The easiest solution is to just enter ranges (e.g. 0-200).
- Greater than, less than, equals: You can use the greater than (>) or less than (<) symbols and combine them with ‘equals’ (=) to define your ranges (e.g. >200).
- Multiple ranges using ‘OR’: You can also list multiple ranges using the ‘OR’ operator (e.g. <100 or >= 200)
The example below shows how you can customize a reference range in your own profile based on the options above.
Note 1: You can choose to omit a certain risk profile if you choose. For example, many users will choose to omit the ‘moderate’ risk section and only enter values for ‘low risk’ and ‘high risk.’ This is permitted and we will simply omit colors for any values within a range that has not been set.
Note 2: If you make a mistake, you can use the ‘reset’ link to restore the default values.
If you have any questions, comments or concerns on customizing lab ranges, let us know. You can also reference the video below for specific instructions. If you’re ready to create you account and start logging some data, sign-up with the button below.
[maxbutton id=”1″]


